Contents:
1. UmDESK
1.1 Mechanical / Electrical specification
1.2 Software specification
1.3 Hardware Options
1.4 Software options
2. Installation
2.1 Getting started
2.2 Test call
2.3 Log in
2.4 IP and network configuration (optional)
2.5 A5 1/2 encryption configuration (optional)
1. UmDESK
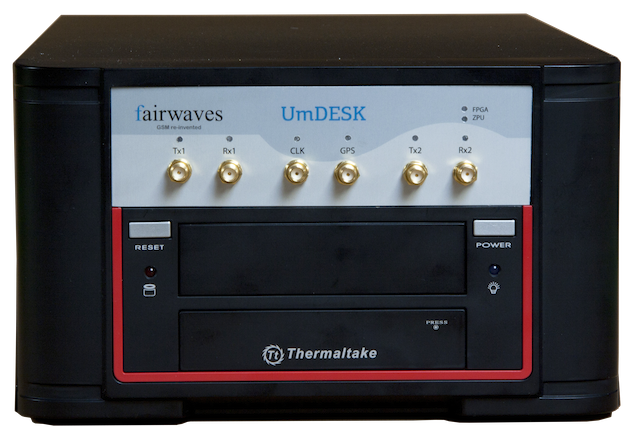
The UmDESK is an IP-backhaul GSM Network In The Box shaped in mini-ITX case which has the ability to work separately as BTS and BSC. As NITB, it includes BSC, MSC, HLR, VLR, and SMSC core network components.
1.1 Mechanical specification
Enclosure
- • Dimensions: 130 x 220 x 330 mm
- • Weight: 3.8 kg
Environmental conditions
- • Indoor
- • +10 to +30 C operational temperature
RF Input/Output
- • GSM 850/900/1800/1900
- • 2 independent TRX
- • Diversity receive
- • Multi-ARFCN on each TRX (beta)
- • Max output power per TRX: 100mW (850/900 bands), 50mW (1800/1900 bands)
- • 1W per channel (2x1W) with external boosters
Reference Clock
- • GPS (default)
- • OCXO (optional)
CPU
- • Intel Atom
Input Voltage and Power
- • 110-220 VAC
- • Power consumption: less than 80W
Backhaul Interface
- • RJ45 Ethernet (100/1000Mbit)
Antenna
- • 850/900/1800/1900 GSM frequency band compatible.
1.2 Software specification
Number of Transceivers
- • 2 TRX / 16 timeslots
Supported timeslot configurations
- • CCCH, CCCH+SDCCH/4, SDCCH/8, TCH/F, TCH/H
Voice codecs
- • FR/HR/EFR/AMR; RTP stream
Ciphering
- • A5/0, A5/1, A5/2 and A5/3
GPRS/EDGE
- • GPRS - beta
- • EDGE - planned
Operating System
Embedded Linux
Capacity
- • maximum concurrent calls (Full/Half) Rate 15/30
- • maximum simultaneous SMS 124 (15SDCCH/8 + 1SDCCH/4)
1.3 Hardware options
- • Internal duplexer
- • External cavity duplexer
- • External 1W booster
- • Clocking: OCXO / GPS disciplined
1.4 Software variant
- • BTS-only (variant of connection of the BTS to an external BSC)

- • BSC (BTS run as an internal instance of OpenBSC)

- • NITB (Fully autonomous GSM PBX with VoIP gateway (SIP interface))

The difference between those variants is only in the installed and configured software packages on the Linux-based OS.
2. Installation
Base station comes with already installed and configured software
2.1 Getting started
-
• Connect to a power source, attach GSM antennas, monitor and turn it on.
-
• Check the LEDs on the front panel (TX1 RX1 TX2 RX2). If it lights up, UmDESK works properly.
-
• Make sure that the Ethernet cable is connected.
2.2 Test call
Searching for the Network
-
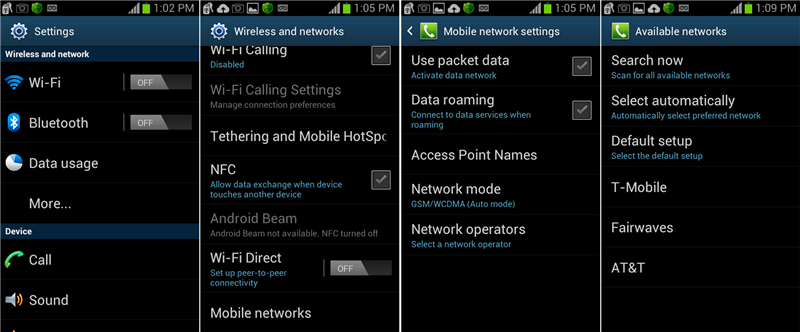
Launch the Settings from the menu system.
-
1. Select More
-
2. Select Mobile networks
-
3. Select Network operators
-
4. Select Search networks
Options:
-
• 1002 - echo call (listen yourself)
-
• *#100# - to figure out the number that was assigned to your phone.
2.3 Log in
In order to configure and administer the UmDESK, you have to attach monitor or log in into device remotely over SSH. There are two physical ethernet interfaces. External interface IP is 192.168.50.100 also it's configured to obtain IP address via DHCP. 192.168.10.10 is internal interface for the UmTRX.
NOTE: Small inch monitors might have a displaying problem with console mode resolution.
just add
blacklist gma500_gfx
line to
/etc/modprobe.d/blacklist-framebuffer.conf
in order to disable Linux Kernel Framebuffer for this graphics driver.
Connect laptop to the UmDESK via Ethernet cable.
NOTE: Before startng to work with the device, set up IP address on laptop like 192.168.50.200
- 1. Run PuTTY
- 2. Type IP address: 192.168.50.100
- Login: fairwaves
- Password: fairwaves
Once you have logged into the system, you will be at a Linux shell command prompt.
You may use a deferent client software for remote access, we recommend PuTTY (you can download at www.putty.org ). PuTTY is an open source SSH and telnet client, for the Windows platform.
2.4 IP and network configuration (optional)
eth0 - 192.168.10.10 This is internal interface linked to the UmTRX. Do not edit this
eth1 - Configured to obtain IP address through DHCP. In case of recovery, it also has a static IP 192.168.50.100
Edit eth1 in /etc/network/interfaces.d/ In order to change network configuration
Shell> sudo nano /etc/network/interfaces.d/eth1
Refer to Ubuntu documentation UBUNTU for details
2.5 A5 1/2 encryption configuration (optional)
Open /etc/osmocom/openbsc.cfg configuration file and change encryption a5 0 to encryption a5 1. Restart osmo-nitb:
Shell> sudo sv restart osmo-nitb
In order to perform cryptographic authentication of the subscriber, his Ki needs to be known to the HLR/AUC. Furthermore, the authentication algorithm implemented on the SIM card (A3/A8) must match that of the algorithm configured in the HLR.
In order to configure a subscriber for COMP128v1 and to set his Ki, you can use the following VTY command from the enable node:
Shell> OpenBSC# subscriber extension 2342 a3a8 comp128v1 000102030405060708090a0b0c0d0e0f
If you prefer to provision the SIM cards yourself, you can use the pySim tool available from http://cgit.osmocom.org/cgit/pysim/ . It has the ability to append the newly-provisioned SIM cards to an existing HLR database, please check its --write-hlr command line argument.